By default Blogger shows links to Newer Post, Home, and Older Post at the bottom of a post. There are hacks that add post titles to those links, couple by me, too, here's the latest: Add Post titles to Older and Newer Post links – reloaded. In one comment I was asked if it would be possible to display also thumbnail and post summary. It is.
I have installed this hack in my MS-potilas blog, which is in Finnish (you'll see the idea without understanding the language):
Installing the hack
You need to edit your blog's template. I use jQuery in this hack, so you need jQuery. If you already have it loaded, you can leave the first line out of the hack.
Open blog's template, and put this code before </head>:
If you have any previous hack for Newer/Older post links, remove it. Save the template and test.
Configuration
You can configure the following javascript variables:
maxSummaryLength - how many characters can summary text be
olderLink - contains the template for older link
newerLink - template for newer link
defaultOlderImage - if older post has no thumbnail, use this image instead
defaultNewerImage - if newer post has no thumbnail, use this image instead
In olderLink and newerLink templates you can use html and fields [title], [date], [datetime], [img], [thumburl], and [summary]. You can also edit the CSS to make everything look different. Hope you like this hack!
Showing posts with label feed. Show all posts
Showing posts with label feed. Show all posts
Wednesday, November 27, 2013


Wednesday, June 27, 2012
25
Add Post titles to Older and Newer Post links – reloaded
When viewing a single Blogger blog post there are links to Newer Post, Home, and Older Post at the bottom of the page. Unfortunately the Newer and Older post links only contain text "Newer Post" and "Older Post", not the actual post titles. Wordpress, from where I migrated to Blogger, can display the post titles. But not Blogger...
Previous hacks
There are already some hacks to do this. One of the first is by ETBlue, here's that hack. It works very well, but it skews the stats: the loading of two extra posts by jQuery results in two extra stats hits for an opened post.
I did a hack, too, which adresses the stats problem, it is here. It uses somewhat different method to get the post titles: they are fetched from the blog feed, or generated from the blog url (=pseudo title), so no extra posts are loaded, so we have no stats skew. The problem is that is only gets real titles for 500 latest posts. Older posts get a pseudo title. 500 is sufficient in most cases. The script could be modified to get 1000 posts, or more, but it would take some time to load the feeds.
In a comment of my previous hack Duy Pham gave a link to his Older/Newer post title hack. He has an excellent solution for getting the titles from the blog feed: first get the index using publishing date of the post, then retrieve maximum of 3 posts (previous, this post and next post) from a feed.
Duy Pham's hack was so inspiring, that I started coding the thing same in jQuery (Duy uses javascript), and to be compatible with my previous hack. The result has 2 lines less code than the previous hack, and many more features:
Post titles to Older and Newer Post links – reloaded
Installing the hack
You need to edit your blog's template. I use jQuery in this hack, so you need jQuery. Check your template, and if it does not have jQuery, insert this before </head:>
Then find </body> and insert this code (just) before it:
If you had the previous version installed, you can replace the old code. Save the template, and the hack is installed!
Configuration
You can configure the following javascript variables:
olderLink - contains the template for older link, you can use [title] in this
newerLink - template for newer link, you can use [title] in this
olderTitle - template for older link title, you can use [title], [date] and [datetime] in this
newerTitle - template for newer link title, you can use [title], [date] and [datetime] in this
You can use any html, too, for example you can use images. If you use the default olderLink and newerLink, you can also style classes .blog-pager-older-link-title and .blog-pager-older-link-title.
The previous/next links need some styling, so that post titles fit better. For example something like this in Simple template; add these to the styles section of your template (or use Template Designer|Advanced|Add CSS):
Hope you like this hack!
Previous hacks
There are already some hacks to do this. One of the first is by ETBlue, here's that hack. It works very well, but it skews the stats: the loading of two extra posts by jQuery results in two extra stats hits for an opened post.
I did a hack, too, which adresses the stats problem, it is here. It uses somewhat different method to get the post titles: they are fetched from the blog feed, or generated from the blog url (=pseudo title), so no extra posts are loaded, so we have no stats skew. The problem is that is only gets real titles for 500 latest posts. Older posts get a pseudo title. 500 is sufficient in most cases. The script could be modified to get 1000 posts, or more, but it would take some time to load the feeds.
In a comment of my previous hack Duy Pham gave a link to his Older/Newer post title hack. He has an excellent solution for getting the titles from the blog feed: first get the index using publishing date of the post, then retrieve maximum of 3 posts (previous, this post and next post) from a feed.
Duy Pham's hack was so inspiring, that I started coding the thing same in jQuery (Duy uses javascript), and to be compatible with my previous hack. The result has 2 lines less code than the previous hack, and many more features:
Post titles to Older and Newer Post links – reloaded
Installing the hack
You need to edit your blog's template. I use jQuery in this hack, so you need jQuery. Check your template, and if it does not have jQuery, insert this before </head:>
<script src='http://code.jquery.com/jquery-latest.js' type='text/javascript'></script>
Then find </body> and insert this code (just) before it:
If you had the previous version installed, you can replace the old code. Save the template, and the hack is installed!
Configuration
You can configure the following javascript variables:
olderLink - contains the template for older link, you can use [title] in this
newerLink - template for newer link, you can use [title] in this
olderTitle - template for older link title, you can use [title], [date] and [datetime] in this
newerTitle - template for newer link title, you can use [title], [date] and [datetime] in this
You can use any html, too, for example you can use images. If you use the default olderLink and newerLink, you can also style classes .blog-pager-older-link-title and .blog-pager-older-link-title.
The previous/next links need some styling, so that post titles fit better. For example something like this in Simple template; add these to the styles section of your template (or use Template Designer|Advanced|Add CSS):
.blog-pager-newer-link {background-color:transparent !important;padding: 0 !important;}
.blog-pager-older-link {background-color:transparent !important;padding: 0 !important;}
#blog-pager-newer-link {padding:5px;font-size:90%;width:200px;text-align:left;}
#blog-pager-older-link {padding:5px;font-size:90%;width:200px;text-align:right;}
.home-link {left:0px;position:absolute;margin-left:250px;text-align:center;width:60px;white-space:nowrap;}
If you don't have Simple template, test and change styles if needed. Values for .home-link work with 560px wide text area (250x2+60=560), change accordingly if needed. If "Home" text is very wide in your language, you may also have to change the values (test and see if it works). Of course you can style everything quite differently than me, that's just CSS. :)Hope you like this hack!
Friday, June 8, 2012
3
Small update to Adding Post titles to Older and Newer Post links
Since Blogger has started rolling out local domains, depending where you view the blog, the links inside the blog may not be anymore blogname.blogspot.com/ but may be for example blogname.blogspot.co.uk/ or blogname.blogspot.fi/.
However, the urls are internally still blogspot.com and also in blog's feeds. My hack for Adding post titles to Older and Newer Post links fetches the posts' urls and titles from feed and tries to change the older/newer post links' texts to post titles using the url. Local domains disturbed this, no match was found and a pseudo title was generated instead.
So I had to make a small update that changes the local domain back to .com before matching it with feed urls. Lines 34 and 41 are new, both containing this same code:
Update June 27th 2012: new version of this hack is here, I suggest you consider using it instead of this.
However, the urls are internally still blogspot.com and also in blog's feeds. My hack for Adding post titles to Older and Newer Post links fetches the posts' urls and titles from feed and tries to change the older/newer post links' texts to post titles using the url. Local domains disturbed this, no match was found and a pseudo title was generated instead.
So I had to make a small update that changes the local domain back to .com before matching it with feed urls. Lines 34 and 41 are new, both containing this same code:
href = href.replace(/\.blogspot\.[^/]+\//, ".blogspot.com/");If you have this hack installed, I suggest you make the same update. See the whole hack with installation instructions here, source code updated: Add post titles to Older and Newer Post links.
Update June 27th 2012: new version of this hack is here, I suggest you consider using it instead of this.
Friday, May 25, 2012
0
Extending Yahoo! Pipes with Google App Engine
In my Uploads and Favorites pipe I wanted to turn the timestamps into so called "humanized dates", like these six examples:
23 seconds ago
1 minute ago
4 hours ago
2 days ago
7 months ago
1 year ago
This could not be done by using only Yahoo! Pipes.
Google App Engine to the rescue
Yahoo! Pipes can be extended using a web service, which accepts the feed items as json, and outputs them (after changes) as json. I used this blog article Using Google App Engine to Extend Yahoo! Pipes as a starting point. Django framework has date humanizing functions coded in Python, and I borrowed those functions from there. Then I created a new Google App Engine application "humandate", and made files app.yaml and humandate.py.
app.yaml
humandate.py
I put these two files in a directory called "humandate" under my Google App Engine directory, with favicon.ico (the GAE default icon), and the development environment is ready. I now can deploy the application using "./appcfg.py update humandate/" or test it locally using "./dev_appserver.py humandate/", then the app runs at http://localhost:8080.
Testing the date humanizer
I made also an url based interface to "humandate" in addition to Yahoo! Pipes json interface. Url based interface works by giving a unix timestamp as "unixtime" parameter, like this. This made testing the date humanizer easier.
Using the service in Yahoo! Pipes
This service expects items to have y:published.utime field present. Service reads it from every item, turns it into a humanized date, and makes a new field "when" containing the humanized date. Then the service returns the items back to pipes.

See also my previous article about the four youtube pipes I've made (one of them uses this humandate, and one uses it indirectly). And have fun with Google App Engine and Yahoo! Pipes.
23 seconds ago
1 minute ago
4 hours ago
2 days ago
7 months ago
1 year ago
This could not be done by using only Yahoo! Pipes.
Google App Engine to the rescue
Yahoo! Pipes can be extended using a web service, which accepts the feed items as json, and outputs them (after changes) as json. I used this blog article Using Google App Engine to Extend Yahoo! Pipes as a starting point. Django framework has date humanizing functions coded in Python, and I borrowed those functions from there. Then I created a new Google App Engine application "humandate", and made files app.yaml and humandate.py.
app.yaml
humandate.py
I put these two files in a directory called "humandate" under my Google App Engine directory, with favicon.ico (the GAE default icon), and the development environment is ready. I now can deploy the application using "./appcfg.py update humandate/" or test it locally using "./dev_appserver.py humandate/", then the app runs at http://localhost:8080.
Testing the date humanizer
I made also an url based interface to "humandate" in addition to Yahoo! Pipes json interface. Url based interface works by giving a unix timestamp as "unixtime" parameter, like this. This made testing the date humanizer easier.
Using the service in Yahoo! Pipes
This service expects items to have y:published.utime field present. Service reads it from every item, turns it into a humanized date, and makes a new field "when" containing the humanized date. Then the service returns the items back to pipes.

See also my previous article about the four youtube pipes I've made (one of them uses this humandate, and one uses it indirectly). And have fun with Google App Engine and Yahoo! Pipes.
Thursday, May 24, 2012
0
Yahoo! Pipes, pipes, and more pipes for YouTube
Lately I've been playing around with Yahoo! Pipes and learned some new things. I already presented the YouTube Activity Feed, which I've cleaned up a little. And I've made three more pipes.
YouTube Activity Feed
Pipe ID: 58c841d14337ba4fbf693abd9701dc49
Pipe Web Address: http://pipes.yahoo.com/mspotilas/youtubeactivityfeed
Here's my previous article about this feed. YouTube API 2.0 does provide activity feeds, but you need to register an application to get developer key. My idea was to read the same info from user's channel feed page in html, parse the html and republish as a feed, and YouTube Activity Feed pipe does that.
As html parsing is quite complex task, if YouTube changes the feed page structure a lot, this pipe might break. I'll probably try to fix it if that happens.
YouTube Likes Feed
Pipe ID: a58d86555f7eb396e73d58ff50edc8f1
Pipe Web Address: http://pipes.yahoo.com/mspotilas/youtubelikesfeed
Same idea as in Youtube Activity Feed, but it gets only "liked videos" from the channel feed page. It is a bit simpler to parse only the likes. Also with this pipe, if YouTube changes the feed page a lot, the pipe might break.
YouTube Uploads and Favourites
Pipe ID: 0c2ee991c8d94ed0ceb19865c252e047
Pipe Web Address: http://pipes.yahoo.com/mspotilas/youtubeuploadsfavoritesfeed
YouTube has gdata feeds for user uploads and user favorites.
http://gdata.youtube.com/feeds/base/users/USERNAME/uploads?alt=rss&v=2
and
http://gdata.youtube.com/feeds/base/users/USERNAME/favorites?alt=rss&v=2
This pipe combines these two feeds, descriptions will be for example "2 days ago USERNAME favorited" or "1 hour ago USERNAME uploaded". The tricky part was to get this humanized date "2 days ago" derived from feed item's timestamp. It could not be done in Pipes only, so I extended its functionality with a web service I coded into Google AppEngine. It goes through the list, converts "y:published.utime" to humanized date like "2 days ago" and stores it in field "when" and returns the list back to pipes. Here's an article about the web service: Extending Yahoo! Pipes with Google App Engine.
This pipe should be robust, as it uses feeds as source, not page html.
YouTube Feed
Pipe ID: 73c5ee4a46e1837d908deaa60b1858d2
Pipe Web Address: http://pipes.yahoo.com/mspotilas/youtubefeed
This fourth pipe simply combines Uploads and Favourites and Likes Feed. Structure is very simple. Output is something similar to YouTube Activity feed, but it does not contain comments, playlist additions nor channel subscriptions. But sometimes simpler is better.
All pipes are compatible with my gadget which works also on Opera (Yahoo! Pipes badge does not). Just change the pipe ID (_id) to use a different pipe.
Feel free to examine these pipes, you can also make clones which you can modify. Comments are welcome, too. :)
YouTube Activity Feed
Pipe ID: 58c841d14337ba4fbf693abd9701dc49
Pipe Web Address: http://pipes.yahoo.com/mspotilas/youtubeactivityfeed
Here's my previous article about this feed. YouTube API 2.0 does provide activity feeds, but you need to register an application to get developer key. My idea was to read the same info from user's channel feed page in html, parse the html and republish as a feed, and YouTube Activity Feed pipe does that.
As html parsing is quite complex task, if YouTube changes the feed page structure a lot, this pipe might break. I'll probably try to fix it if that happens.
YouTube Likes Feed
Pipe ID: a58d86555f7eb396e73d58ff50edc8f1
Pipe Web Address: http://pipes.yahoo.com/mspotilas/youtubelikesfeed
Same idea as in Youtube Activity Feed, but it gets only "liked videos" from the channel feed page. It is a bit simpler to parse only the likes. Also with this pipe, if YouTube changes the feed page a lot, the pipe might break.
YouTube Uploads and Favourites
Pipe ID: 0c2ee991c8d94ed0ceb19865c252e047
Pipe Web Address: http://pipes.yahoo.com/mspotilas/youtubeuploadsfavoritesfeed
YouTube has gdata feeds for user uploads and user favorites.
http://gdata.youtube.com/feeds/base/users/USERNAME/uploads?alt=rss&v=2
and
http://gdata.youtube.com/feeds/base/users/USERNAME/favorites?alt=rss&v=2
This pipe combines these two feeds, descriptions will be for example "2 days ago USERNAME favorited" or "1 hour ago USERNAME uploaded". The tricky part was to get this humanized date "2 days ago" derived from feed item's timestamp. It could not be done in Pipes only, so I extended its functionality with a web service I coded into Google AppEngine. It goes through the list, converts "y:published.utime" to humanized date like "2 days ago" and stores it in field "when" and returns the list back to pipes. Here's an article about the web service: Extending Yahoo! Pipes with Google App Engine.
This pipe should be robust, as it uses feeds as source, not page html.
YouTube Feed
Pipe ID: 73c5ee4a46e1837d908deaa60b1858d2
Pipe Web Address: http://pipes.yahoo.com/mspotilas/youtubefeed
This fourth pipe simply combines Uploads and Favourites and Likes Feed. Structure is very simple. Output is something similar to YouTube Activity feed, but it does not contain comments, playlist additions nor channel subscriptions. But sometimes simpler is better.
All pipes are compatible with my gadget which works also on Opera (Yahoo! Pipes badge does not). Just change the pipe ID (_id) to use a different pipe.
Feel free to examine these pipes, you can also make clones which you can modify. Comments are welcome, too. :)
Friday, May 18, 2012
4
 I've had this idea for some time: somehow republish YouTube channel activity feed page as an RSS feed. So you could get a view of your latest YouTube activity in your blog, for example. This week I finally implemented a version of this using Yahoo! Pipes. This is a completely new gadget for Blogger, I have not seen anything like this before. You can use the pipe gadget output on WordPress and other internet pages, too. And you can get the RSS address for the pipe to connect it with various services and/or applications.
Link to the pipe: pipes.yahoo.com/mspotilas/youtubeactivityfeed.
And here's the "badge output" of that pipe from my youtube feed page, with 5 items:
This can be put into a sidebar gadget, like I've done in YABTB demo blog. The code to put inside an HTML/Javascript gadget is simple:
You may also use the "Get as a Badge" link when the pipe is run in the pipe's page, it offers an automated gadget installation into Blogger blogs, WordPress blogs and others.
Update May 21th: Because Badge output does not work with Opera browser, you might consider using instead a gadget made by me, which works with Opera.
Parameters of the pipe:
user: youtube user name,
max-results: maximum number of items returned,
allow: only accept entries that have this word in description, for example "liked" to get only likes or "uploaded" to get only uploads,
disallow: don't allow entries that have this word in description, for example "commented" to filter out commenting activity.
So at minimum you just have to change the user parameter value from "mspotilas" to any youtube user name you want (it does not have to be yours, try for example "NBC"). In my YABTB demo blog, to show what can be done with CSS styles, I also changed background colors, adjusted font sizes and margins, changed thumbnail to right side, changed thumbnail proportions (size), and hid the footer (powered by and get this), like this:
There is also a YouTube RSS feed, but... YouTube gdata feed for YouTube channel includes only uploads. No likes, favourites, comments, etc. Link to YouTube user's RSS feed of uploads is:
For example my YouTube channel's RSS feed is:
This is my very first Yahoo Pipe, so the implementation might be a bit clumsy. But it works, at least in my tests. :) You can clone the pipe and modify it according to your needs, or use this pipe if it suits you as is. If you like it, or find some bugs or something to improve, please tell me.
Update May 20th: I found out that Opera browser is not supported by Yahoo! Pipes. :( I think I could make a gadget for the pipe which would work in Opera, too, but I'm not sure if I will. About 3 % of my blog's viewers do use Opera.
Update May 21th: Here's the gadget I made, works with Opera, too.
Yahoo! Pipe to show YouTube activity feed in Blogger, WordPress, etc.

Link to the pipe: pipes.yahoo.com/mspotilas/youtubeactivityfeed.
And here's the "badge output" of that pipe from my youtube feed page, with 5 items:
This can be put into a sidebar gadget, like I've done in YABTB demo blog. The code to put inside an HTML/Javascript gadget is simple:
You may also use the "Get as a Badge" link when the pipe is run in the pipe's page, it offers an automated gadget installation into Blogger blogs, WordPress blogs and others.
Update May 21th: Because Badge output does not work with Opera browser, you might consider using instead a gadget made by me, which works with Opera.
Parameters of the pipe:
user: youtube user name,
max-results: maximum number of items returned,
allow: only accept entries that have this word in description, for example "liked" to get only likes or "uploaded" to get only uploads,
disallow: don't allow entries that have this word in description, for example "commented" to filter out commenting activity.
So at minimum you just have to change the user parameter value from "mspotilas" to any youtube user name you want (it does not have to be yours, try for example "NBC"). In my YABTB demo blog, to show what can be done with CSS styles, I also changed background colors, adjusted font sizes and margins, changed thumbnail to right side, changed thumbnail proportions (size), and hid the footer (powered by and get this), like this:
There is also a YouTube RSS feed, but... YouTube gdata feed for YouTube channel includes only uploads. No likes, favourites, comments, etc. Link to YouTube user's RSS feed of uploads is:
http://gdata.youtube.com/feeds/base/users/youtubeusername/uploads?alt=rss&v=2&orderby=published
For example my YouTube channel's RSS feed is:
This is my very first Yahoo Pipe, so the implementation might be a bit clumsy. But it works, at least in my tests. :) You can clone the pipe and modify it according to your needs, or use this pipe if it suits you as is. If you like it, or find some bugs or something to improve, please tell me.
Update May 20th: I found out that Opera browser is not supported by Yahoo! Pipes. :( I think I could make a gadget for the pipe which would work in Opera, too, but I'm not sure if I will. About 3 % of my blog's viewers do use Opera.
Update May 21th: Here's the gadget I made, works with Opera, too.
Wednesday, May 2, 2012
36
Top Commentators Gadget with avatars
I had a request of this gadget in one blog comment. There are some top commentators gadgets around, most relying on a Yahoo pipe. I knew it can be done with just javascript, with no pipes. Demo: it is installed on this blog, look at the right sidebar. Hope you like it. :)
Features
You can configure the maximum number of top commentators, and minimum number of comments one must have to get on the list (to weed out the 1 comment commentators, if wanted, for example). Own nick and a list of other nicks (for example "Anonymous") can be excluded from the list. Output strings can be translated.
The Script, installing
Add a HTML/Javascript gadget to your blog, and paste the following code into it.
Script configuration
There are two CSS definitions at first, which can be changed to your liking. After that there comes javascript code and configurable variables. Here is a list of the variables and a short explanation.
maxTopCommenters: how big the list is at maximum
minComments: how many comments must top commentator have at least
numDays: from how many days (ex. 30), or 0 from "all the time" (max 500 comments)
excludeMe: true, if own comments excluded
excludeUsers: array of usernames to exclude
maxUserNameLength: if 0, don't cut; if > 4, cut lenghty usernames
txtTopLine: specifies, what is output on each line. This text can have simple variables, which are: [#], [image], [user], and [count]. [#] is substituted by position on the list, [image] by commentator's avatar image, [user] by commentator name and [count] by number of comments. Text can also contain html.
txtNoTopCommenters: what to display, if list is empty
txtAnonymous: "Anonymous" username localized, or empty if English text "Anonymous" is to be used
getTitles: if true, fetch titles from post feed; if false, titles are generated from url
blogger favico [B]
urlMyAvatar: especially if trueAvatars = false, set here the url to your avatar image
urlMyProfile: if you don't have a profile gadget on page, put your profile url here!
urlAnoAvatar: anonymous avatar, you can change from mystery man to a custom one, if you want, possibly this
urlNoAvatar: comment feed offers the icon (Blogger logo) for those Bloggers who have not set their profile image. You can override the icon with this setting (default: ).
cropAvatar: crop avatar to square (true) or stretch (false) to square
sizeAvatar: size of avatar in x and y direction, pixels
If you have very much comments (thousands and thousands of them), I suggest you to use this as "top commentators of 30 days" gadget or something like that (set numDays variable to 30), so that it won't take too long to load and calculate all the comments.
June 5th 2012: Small CSS update: Blogger changed the paddings of .profile-name-link, that's why I added this line (line 3.):
.top-commenter-line .profile-name-link {padding-left:0;}
August 1st 2017: To fix avatars, please change lines 48 and 49 (article code is updated).
Features
You can configure the maximum number of top commentators, and minimum number of comments one must have to get on the list (to weed out the 1 comment commentators, if wanted, for example). Own nick and a list of other nicks (for example "Anonymous") can be excluded from the list. Output strings can be translated.
The Script, installing
Add a HTML/Javascript gadget to your blog, and paste the following code into it.
Script configuration
There are two CSS definitions at first, which can be changed to your liking. After that there comes javascript code and configurable variables. Here is a list of the variables and a short explanation.
maxTopCommenters: how big the list is at maximum
minComments: how many comments must top commentator have at least
numDays: from how many days (ex. 30), or 0 from "all the time" (max 500 comments)
excludeMe: true, if own comments excluded
excludeUsers: array of usernames to exclude
maxUserNameLength: if 0, don't cut; if > 4, cut lenghty usernames
txtTopLine: specifies, what is output on each line. This text can have simple variables, which are: [#], [image], [user], and [count]. [#] is substituted by position on the list, [image] by commentator's avatar image, [user] by commentator name and [count] by number of comments. Text can also contain html.
txtNoTopCommenters: what to display, if list is empty
txtAnonymous: "Anonymous" username localized, or empty if English text "Anonymous" is to be used
getTitles: if true, fetch titles from post feed; if false, titles are generated from url
blogger favico [B]
urlMyAvatar: especially if trueAvatars = false, set here the url to your avatar image
urlMyProfile: if you don't have a profile gadget on page, put your profile url here!
urlAnoAvatar: anonymous avatar, you can change from mystery man to a custom one, if you want, possibly this
urlNoAvatar: comment feed offers the icon (Blogger logo) for those Bloggers who have not set their profile image. You can override the icon with this setting (default: ).
cropAvatar: crop avatar to square (true) or stretch (false) to square
sizeAvatar: size of avatar in x and y direction, pixels
If you have very much comments (thousands and thousands of them), I suggest you to use this as "top commentators of 30 days" gadget or something like that (set numDays variable to 30), so that it won't take too long to load and calculate all the comments.
June 5th 2012: Small CSS update: Blogger changed the paddings of .profile-name-link, that's why I added this line (line 3.):
.top-commenter-line .profile-name-link {padding-left:0;}
August 1st 2017: To fix avatars, please change lines 48 and 49 (article code is updated).
Monday, January 2, 2012
0
Comments feed changed and Recent comments update
I found out that comments feed no longer contain the direct link (so called "alternate link") to those comments, that the comment author has deleted. I.e. those, where it reads "This post has been removed by the author.". Comments feed used to have links to all comment entries, but no longer does for these deleted ones.
This affected my recent comments gadgets. I have updated their source code in their posts.
Better Recent comments gadget for Blogger: line 69 is modified, line 76 is new.
Return of the Better Recent Comments gadget: line 121 is modified, line 128 is new.
(newest) Son of the better recent comments gadget: line 124 is modified, line 131 is new.
If you experience recent comments disappearing if there is a new author-deleted comment, please update the gadget, just two lines need to be changed. Another quick fix is to permanently delete the author-deleted comment from the blog's admin comments section.
This affected my recent comments gadgets. I have updated their source code in their posts.
Better Recent comments gadget for Blogger: line 69 is modified, line 76 is new.
Return of the Better Recent Comments gadget: line 121 is modified, line 128 is new.
(newest) Son of the better recent comments gadget: line 124 is modified, line 131 is new.
If you experience recent comments disappearing if there is a new author-deleted comment, please update the gadget, just two lines need to be changed. Another quick fix is to permanently delete the author-deleted comment from the blog's admin comments section.
Tuesday, December 20, 2011
2
Comment feed has now Blogger avatars
I added avatars to my recent comment gadget using a helper application coded in Python. Blogger has updated its feed format now in December 2011, and comment feeds now include also author avatars (author images) for Blogger users. The update is of course because of the dynamic views – I think everything dynamic views can display comes from feeds (unlike in the "traditional" blogger views).
This is great, and at the same time, will render my avatar fetching application pretty much obsolete. Although it will still work.
I found out about this feed update reading Aratina Cage's Last Comments blog. There's some impressive work, I recommend to check it out: very versatile recent comments gadget, and the new InComm, which looks great.
I will later modify my recent comments gadget to use these new author images from feed, instead of the Python app, and will then post the new version. Stay tuned.
This is great, and at the same time, will render my avatar fetching application pretty much obsolete. Although it will still work.
I found out about this feed update reading Aratina Cage's Last Comments blog. There's some impressive work, I recommend to check it out: very versatile recent comments gadget, and the new InComm, which looks great.
I will later modify my recent comments gadget to use these new author images from feed, instead of the Python app, and will then post the new version. Stay tuned.
Tuesday, November 8, 2011
50
Real Sticky posts for Blogger
Sticky post(s) can be useful in a blog, as a featured post, as a notification of an upcoming event, some general info about blog, etc. Again, Wordpress, from where I migrated to Blogger, has this feature. And Blogger does not.
There has been two "hacks" around, until now, to make kind of sticky posts in Blogger, but both have big problems. But maybe one of them suits you, so I'll tell you about these shortly.
Date hack - not good
Publish your post. Edit the post after publishing, under Post Options set post date to somewhere in the future (for example year 2020). Now this post will be the first post in your blog, until 2020 or until you edit the date.
Problem: Messes blog's RSS feed. Your sticky post will be the latest post in the feed until 2020, and so people won't see updates from your blog in services that use RSS. This is bad.
Problem: Your post shows that it is published in the future. You can make code to hide the date but it gets complicated.
Gadget hack - not good
Go to Design, Page Layout, add HTML/Javascript gadget to page, and move it to just above the posts section. Don't give the gadget a title, write your sticky "post" in HTML to look as a post. One variation of this is to edit template html and put the "post" there.
Problem: It is not a post. You cannot comment it. You cannot see it in blog archives. And it does not appear in your Blog RSS feed, either. So for example, if you announce some upcoming event this way, your feed followers won't see it, unless they open your blog page.
Problem: your gadget/template html is shown on every page in your blog, unless you add some code to show it only on the first page, and this gets complicated.
Here is my gadget sticky post hack, with the latter problem solved. It may be a good solution for some blogs, so check it out, here's a demo.
Real sticky posts - excellent!
Sticky post should be a post, with normal publishing date, appearing in Blog feed. It should be easy to make a post sticky, and make a sticky post normal. Sticky posts should have a way to look different from normal posts.
My solution fulfills these requirements. Script pulls the sticky posts from the blog feed, so blog feed must be enabled in blog's settings. And also because blog feed is needed, my sticky posts hack don't unfortunately work in private blogs. You can control posts' sticky state simply by giving post a label, default is "sticky" but you can change that if you want. You can set how many sticky posts are shown at most, and if more "sticky" labels are found than this amount, then the newest posts are shown.
Installation
Edit template html. Put this code just before </body>.
Normally posts posted in same day are grouped together in Blogger layout templates, into same div element. Because of this, if you post a sticky post and a normal post with same date, also the normal post is removed from the page when sticky post is removed and placed on top of the page. To prevent this, you may want to install a simple hack to show dates on all posts, which breaks down the "daily groups". But if you never post two posts in the same day, or edit the sticky posts' dates to be different from any other post, then it is not necessary.
Configuration
You may edit the CSS styles for stickies-container and sticky-post, and configure the following javascript variables:
stickyLabel: the label which turns a post into a sticky post
maxStickies: maximum number of posts displayed as sticky, 1-20 (don't overdo it)
showDate: show date or not, you may want to hide it
showTitle: show post title or not
showFooter: you may want to hide the whole footer
showPostedBy: show Posted By text in footer
showCommentLink: show link to comments in footer
showLabels: show post labels in footer
showStickyLabel: show also the sticky label in the labels list, or hide it
showEmailPost: show Email Post button
showShareButtons: show the sharebuttons group or not
showShareEmail: show email button in sharebuttons
showShareBlog: show blog button in sharebuttons
showShareTwitter: show twitter button in sharebuttons
showShareFacebook: show facebook button in sharebuttons
showSharePlusone: show plus one button in sharebuttons
widthPlusone: you may want to limit this, small enough and text disappears
txtComment: singular form, used in sentence "1 comment", just the text, without number
txtComments: plural form, used in sentence "# comments", just the text, without number
txtPostedBy: text in Posted by, can have variables [user] and [time]
txtLabels: text preceding the labels list
txtMore: "Read more »" text for posts with a jump break.
dynamicMore: if true, jump break text (after "more link") is revealed dynamically
txtHideMore: text of the link to hide "more text", if dynamicMore is used (true)
Using a jump break in a sticky post may be a good idea, so that the sticky post don't become too tall. With variable setting dynamicMore=true the rest of the sticky post is revealed dynamically, which looks great and is faster than a full page load.
You can move the CSS style declarations to body section of the template, if you want, and add more styles to style the sticky posts (know your way around).
There has been two "hacks" around, until now, to make kind of sticky posts in Blogger, but both have big problems. But maybe one of them suits you, so I'll tell you about these shortly.
Date hack - not good
Publish your post. Edit the post after publishing, under Post Options set post date to somewhere in the future (for example year 2020). Now this post will be the first post in your blog, until 2020 or until you edit the date.
Problem: Messes blog's RSS feed. Your sticky post will be the latest post in the feed until 2020, and so people won't see updates from your blog in services that use RSS. This is bad.
Problem: Your post shows that it is published in the future. You can make code to hide the date but it gets complicated.
Gadget hack - not good
Go to Design, Page Layout, add HTML/Javascript gadget to page, and move it to just above the posts section. Don't give the gadget a title, write your sticky "post" in HTML to look as a post. One variation of this is to edit template html and put the "post" there.
Problem: It is not a post. You cannot comment it. You cannot see it in blog archives. And it does not appear in your Blog RSS feed, either. So for example, if you announce some upcoming event this way, your feed followers won't see it, unless they open your blog page.
Problem: your gadget/template html is shown on every page in your blog, unless you add some code to show it only on the first page, and this gets complicated.
Here is my gadget sticky post hack, with the latter problem solved. It may be a good solution for some blogs, so check it out, here's a demo.
Real sticky posts - excellent!
Sticky post should be a post, with normal publishing date, appearing in Blog feed. It should be easy to make a post sticky, and make a sticky post normal. Sticky posts should have a way to look different from normal posts.
My solution fulfills these requirements. Script pulls the sticky posts from the blog feed, so blog feed must be enabled in blog's settings. And also because blog feed is needed, my sticky posts hack don't unfortunately work in private blogs. You can control posts' sticky state simply by giving post a label, default is "sticky" but you can change that if you want. You can set how many sticky posts are shown at most, and if more "sticky" labels are found than this amount, then the newest posts are shown.
Installation
Edit template html. Put this code just before </body>.
Normally posts posted in same day are grouped together in Blogger layout templates, into same div element. Because of this, if you post a sticky post and a normal post with same date, also the normal post is removed from the page when sticky post is removed and placed on top of the page. To prevent this, you may want to install a simple hack to show dates on all posts, which breaks down the "daily groups". But if you never post two posts in the same day, or edit the sticky posts' dates to be different from any other post, then it is not necessary.
Configuration
You may edit the CSS styles for stickies-container and sticky-post, and configure the following javascript variables:
stickyLabel: the label which turns a post into a sticky post
maxStickies: maximum number of posts displayed as sticky, 1-20 (don't overdo it)
showDate: show date or not, you may want to hide it
showTitle: show post title or not
showFooter: you may want to hide the whole footer
showPostedBy: show Posted By text in footer
showCommentLink: show link to comments in footer
showLabels: show post labels in footer
showStickyLabel: show also the sticky label in the labels list, or hide it
showEmailPost: show Email Post button
showShareButtons: show the sharebuttons group or not
showShareEmail: show email button in sharebuttons
showShareBlog: show blog button in sharebuttons
showShareTwitter: show twitter button in sharebuttons
showShareFacebook: show facebook button in sharebuttons
showSharePlusone: show plus one button in sharebuttons
widthPlusone: you may want to limit this, small enough and text disappears
txtComment: singular form, used in sentence "1 comment", just the text, without number
txtComments: plural form, used in sentence "# comments", just the text, without number
txtPostedBy: text in Posted by, can have variables [user] and [time]
txtLabels: text preceding the labels list
txtMore: "Read more »" text for posts with a jump break.
dynamicMore: if true, jump break text (after "more link") is revealed dynamically
txtHideMore: text of the link to hide "more text", if dynamicMore is used (true)
Using a jump break in a sticky post may be a good idea, so that the sticky post don't become too tall. With variable setting dynamicMore=true the rest of the sticky post is revealed dynamically, which looks great and is faster than a full page load.
You can move the CSS style declarations to body section of the template, if you want, and add more styles to style the sticky posts (know your way around).
Monday, October 31, 2011
23
How to autopost to Blogpost from RSS
Autoposting from RSS feed(s) is a much asked feature in Blogger. I will tell you here one way to accomplish this without third party services. You'll need some computing skills, I won't explain everything in detail, details can be found in other documentation.
First of all, you need the RSS feed or feeds, where the articles appear that you want to republish. You can combine multiple feeds into one using Google Reader, if you wish: group feeds together in a folder and make folder feed public and shared. But you don't have to combine feeds, multiple feeds are ok as is.
Don't steal other people's work. Before publishing content written by other's, you should ask permission for it, otherwise your blog may be reported and terminated. But maybe you want to aggregate your own posts from many blogs to one blog. And this can be done from other/mixed environments, like Wordpress.com, too, and to a hidden blog (visible only to you). Not from hidden blogs, though, because you need the feed. If you republish your own material, that is ok of course.
Blog settings and setting up rss2email
In the blog you want to publish, go to Settings | Email & Mobile. Set your secret email posting address by providing a secret word. Choose "Save emails as draft posts". You can change that to "Publish emails immediately" after you have directed feed(s) to blog and have everything working.
Rss2email is a free tool for delivering news from RSS feeds to email. Python is needed to run rss2email. Rss2email can be run in Windows and different UNIX systems.
Download, install and configure rss2email. I had to change the outgoing mail server settings and the email address of sender (DEFAULT_FROM) in config.py. I also configured rss2email to use html (HTML_MAIL = 1) and not to use stylesheet (USE_CSS_STYLING = 0).
In unix console, change to rss2email's directory, and execute commands:
./r2e new YOURNAME.YOURSECRETWORDS@blogger.com
./r2e add http://yourfeedurl.com
./r2e add http://yoursecondfeedurl.com
./r2e add http://yourthirdfeedurl.com
In Windows you would run r2e.bat instead of ./r2e. You need at least one feed url. Now you have your feed(s) ready for sending to blog.
Sending old (current) entries or not?
If you want to start feeding your blog with only new entries in the feed(s), run first:
./r2e run --no-send
That marks all current feed entries read. Afterwards run ./r2e in regular basis, for example from crontab.
If you want to send all entries, run "r2e run" already at the first time. But beware, there is a limit of about 30-50 posts you can send to Blogger in one day. One way to limit the posts is to add one new feed per day for the publishing email.
You can also publish single posts from a feed using Google Reader. View a post from the feed, select Send To, Blogger.
Double titles hacked away
To prevent "double titles" (first article title, then title with a link to the source) in the receiving blog, I did the following changes to rss2email.py (version 2.71), first around line 717, search for:
If you have different version, then you might have to change something else. The purpose of the changes is to remove <h1> title+link from the beginning of the email body.
Run rss2email automatically
And finally I added a crontab entry (crontab -e) to run the script once an hour (33 minutes past full hour), like this:
33 * * * * cd ~/rss2email-2.71/ && ./r2e run
In Windows you would use the Windows task scheduler and run r2e.bat. See more instructions in rss2email/getting-started-with-rss2email.
I have also subscribed the feeds to my Google Reader, so I decided not to publish the emailed articles immediately, but as a draft. This way I can also do some minor adjustments to the article before publishing, or choose not to publish the article at all.
First of all, you need the RSS feed or feeds, where the articles appear that you want to republish. You can combine multiple feeds into one using Google Reader, if you wish: group feeds together in a folder and make folder feed public and shared. But you don't have to combine feeds, multiple feeds are ok as is.
Don't steal other people's work. Before publishing content written by other's, you should ask permission for it, otherwise your blog may be reported and terminated. But maybe you want to aggregate your own posts from many blogs to one blog. And this can be done from other/mixed environments, like Wordpress.com, too, and to a hidden blog (visible only to you). Not from hidden blogs, though, because you need the feed. If you republish your own material, that is ok of course.
Blog settings and setting up rss2email
In the blog you want to publish, go to Settings | Email & Mobile. Set your secret email posting address by providing a secret word. Choose "Save emails as draft posts". You can change that to "Publish emails immediately" after you have directed feed(s) to blog and have everything working.
Rss2email is a free tool for delivering news from RSS feeds to email. Python is needed to run rss2email. Rss2email can be run in Windows and different UNIX systems.
Download, install and configure rss2email. I had to change the outgoing mail server settings and the email address of sender (DEFAULT_FROM) in config.py. I also configured rss2email to use html (HTML_MAIL = 1) and not to use stylesheet (USE_CSS_STYLING = 0).
In unix console, change to rss2email's directory, and execute commands:
./r2e new YOURNAME.YOURSECRETWORDS@blogger.com
./r2e add http://yourfeedurl.com
./r2e add http://yoursecondfeedurl.com
./r2e add http://yourthirdfeedurl.com
In Windows you would run r2e.bat instead of ./r2e. You need at least one feed url. Now you have your feed(s) ready for sending to blog.
Sending old (current) entries or not?
If you want to start feeding your blog with only new entries in the feed(s), run first:
./r2e run --no-send
That marks all current feed entries read. Afterwards run ./r2e in regular basis, for example from crontab.
If you want to send all entries, run "r2e run" already at the first time. But beware, there is a limit of about 30-50 posts you can send to Blogger in one day. One way to limit the posts is to add one new feed per day for the publishing email.
You can also publish single posts from a feed using Google Reader. View a post from the feed, select Send To, Blogger.
Double titles hacked away
To prevent "double titles" (first article title, then title with a link to the source) in the receiving blog, I did the following changes to rss2email.py (version 2.71), first around line 717, search for:
      content += '<h1'
      content += ' class="header"'
      content += '><a href="'+link+'">'+subjecthdr+'</a></h1>\n'
Add # in front of all 3 lines:# content += '<h1' # content += ' class="header"' # content += '><a href="'+link+'">'+subjecthdr+'</a></h1>\n'and around line 748, search lines:
        content = ("<html><body>\n\n" +
                  '<h1><a href="'+link+'">'+subjecthdr+'</a></h1>\n\n' +
                  entrycontent[1].strip() + # drop type tag (HACK: bad abstraction)
                  '<p>URL: <a href="'+link+'">'+link+'</a>' )
Add # in front of one line, like this: content = ("<html><body>\n\n" +
# '<h1><a href="'+link+'">'+subjecthdr+'</a></h1>\n\n' +
entrycontent[1].strip() + # drop type tag (HACK: bad abstraction)
'<p>URL: <a href="'+link+'">'+link+'</a></p>' )
If you have different version, then you might have to change something else. The purpose of the changes is to remove <h1> title+link from the beginning of the email body.
Run rss2email automatically
And finally I added a crontab entry (crontab -e) to run the script once an hour (33 minutes past full hour), like this:
33 * * * * cd ~/rss2email-2.71/ && ./r2e run
In Windows you would use the Windows task scheduler and run r2e.bat. See more instructions in rss2email/getting-started-with-rss2email.
I have also subscribed the feeds to my Google Reader, so I decided not to publish the emailed articles immediately, but as a draft. This way I can also do some minor adjustments to the article before publishing, or choose not to publish the article at all.
Sunday, October 16, 2011
40
Blogger posts from feed in chronological order
A while ago I did my Chronological post order hack, which simply reverses the order of the posts on the screen using javascript. That can be used to read the whole blog from start to end, like this.
Adam has in his Too Clever By Half blog a different solution that uses 3rd party services to manipulate and reverse the feed to be displayed in chronological order, but there are drawbacks in using (free) third party services.
A while ago the Blogger dynamic views were announced. Dynamic views use javascript and AJAX to read from blog feed, and display the entries.
All these things made me think, if the whole reversing thing could be done in Blogger, reading the feed and manipulating it by javascript, without third party services. And it could, I yesterday figured it out, see a demo here. I'll show you how you can do it. It is actually quite easy (once the code is ready), no template editing, for example.
Create a new page
Create a new page in your blog. Name it as you like. Edit the post as HTML (important!), and paste this code into it:
There are some configurable values in the script, which should be self explanatory. If you want, for small blogs you can display all entries on the same page (tested with ~200 entries). The maximum number of entries that this script can display is 500, because of limitations in Blogger feeds. The actual amount may be lower, and it depends how many entries are left in your blog's RSS feed and some Google caches (includeHistoricalEntries). You cannot know, before you try. Formatting of the posts' header and footer is very basic, you can make it better if you want, add social buttons, etc.
Save and test. You can see it in action here: Chronological post order from feed demo.
Not everything can be displayed, for example dynamic content that is generated by javascript. This is a limitation of (Blogger) feeds. That is why some code examples (pastebin.com snippets) don't show in the demo. If you need to display javascript content, too, then you'll better use the other chronological post order hack.
Reference: Google Feed API.
Update March 22th: Google loader no longer need API key. Article and code snippets simplified. Thanks to Adam who tipped me about this in comments. :)
Adam has in his Too Clever By Half blog a different solution that uses 3rd party services to manipulate and reverse the feed to be displayed in chronological order, but there are drawbacks in using (free) third party services.
A while ago the Blogger dynamic views were announced. Dynamic views use javascript and AJAX to read from blog feed, and display the entries.
All these things made me think, if the whole reversing thing could be done in Blogger, reading the feed and manipulating it by javascript, without third party services. And it could, I yesterday figured it out, see a demo here. I'll show you how you can do it. It is actually quite easy (once the code is ready), no template editing, for example.
Create a new page
Create a new page in your blog. Name it as you like. Edit the post as HTML (important!), and paste this code into it:
There are some configurable values in the script, which should be self explanatory. If you want, for small blogs you can display all entries on the same page (tested with ~200 entries). The maximum number of entries that this script can display is 500, because of limitations in Blogger feeds. The actual amount may be lower, and it depends how many entries are left in your blog's RSS feed and some Google caches (includeHistoricalEntries). You cannot know, before you try. Formatting of the posts' header and footer is very basic, you can make it better if you want, add social buttons, etc.
Save and test. You can see it in action here: Chronological post order from feed demo.
Not everything can be displayed, for example dynamic content that is generated by javascript. This is a limitation of (Blogger) feeds. That is why some code examples (pastebin.com snippets) don't show in the demo. If you need to display javascript content, too, then you'll better use the other chronological post order hack.
Reference: Google Feed API.
Update March 22th: Google loader no longer need API key. Article and code snippets simplified. Thanks to Adam who tipped me about this in comments. :)
Tuesday, October 11, 2011
9
Follow post's comments by email in Blogger
"Isn't this a built-in feature?" Yes and no. You can have post comments delivered to your mail, if you have Blogger/Google account, but not if you are OpenID, non-registered or anonymous commenter. There is the Subscribe to Post Comments (Atom) -link, maybe spiced up with RSS icon, but many people don't know what to do with that feed link. So something more user friendly would be nice.
With this little hack you can offer your reader an easy way to subscribe to new comments of a post and get them delivered to reader's email. I use blogtrottr.com feed-to-email service in this hack. I wanted to place the email subscription form beneath the RSS link, which was bit tricky but succeeded. Because RSS feed url opens in new window (target="_blank"), I made the form open its results in target="_blank", too.

Installation is easy, if you know your way around. Open template html for editing. Select Expand widget templates. Search lines:
Now your readers can subscribe to those posts' comments they are interested in. It works either by user entering email address in the form (form has very basic email validation) and clicking the subscribe button, or just by clicking the button, which opens Blogtrottr page where email is asked.
You can test this and my other comments hacks at Playground for Blogger threaded comments.
With this little hack you can offer your reader an easy way to subscribe to new comments of a post and get them delivered to reader's email. I use blogtrottr.com feed-to-email service in this hack. I wanted to place the email subscription form beneath the RSS link, which was bit tricky but succeeded. Because RSS feed url opens in new window (target="_blank"), I made the form open its results in target="_blank", too.

Installation is easy, if you know your way around. Open template html for editing. Select Expand widget templates. Search lines:
    <!-- feed links -->
    <b:include name='feedLinks'/>
After those line add:Now your readers can subscribe to those posts' comments they are interested in. It works either by user entering email address in the form (form has very basic email validation) and clicking the subscribe button, or just by clicking the button, which opens Blogtrottr page where email is asked.
You can test this and my other comments hacks at Playground for Blogger threaded comments.
Sunday, October 9, 2011
0
Add RSS icon to feed link in Blogspot footer
I've seen many complaints that Blogger does not offer user the possibility to follow comments in a post, that user has commented. Well, it kind of does, via RSS feed, but this is often not noticed. When viewing a post, there's a feed link in page footer, but it is in small text not easily recognized. My tip to make it more visible is to add RSS icon to the link.
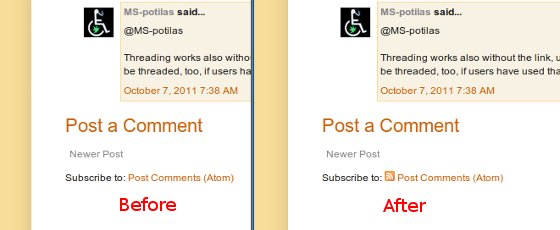
This hack also adds RSS icon to other pages' feed links in footer, for example in front page the link to the blog posts' feed.
Here's how you can do it: Open template html, select Expand Widget Templates. Search for line:
<a class='feed-link' expr:href='data:f.url' expr:type='data:f.mimeType' target='_blank'><data:f.name/> (<data:f.feedType/>)</a>
Change to:
<a class='feed-link' expr:href='data:f.url' expr:type='data:f.mimeType' target='_blank'><img src='http://img1.blogblog.com/img/icon_feed12.png'/> <data:f.name/> (<data:f.feedType/>)</a>
Save.
This hack also adds RSS icon to other pages' feed links in footer, for example in front page the link to the blog posts' feed.
Here's how you can do it: Open template html, select Expand Widget Templates. Search for line:
<a class='feed-link' expr:href='data:f.url' expr:type='data:f.mimeType' target='_blank'><data:f.name/> (<data:f.feedType/>)</a>
Change to:
<a class='feed-link' expr:href='data:f.url' expr:type='data:f.mimeType' target='_blank'><img src='http://img1.blogblog.com/img/icon_feed12.png'/> <data:f.name/> (<data:f.feedType/>)</a>
Save.
Subscribe to:
 Posts (Atom)
 Posts (Atom)
